Grapefruit and Yogurt Pound Cake

Hi ya’ll amidst the transition to a new site, I wanted to share this refreshing little number with you.  “Cake” and “refreshing” aren’t usually words that go together, but this may be one of only a handful of exceptions.

While I am at it, I should admit that I have not met a member of the citrus family that I didn’t like.  Anything that has me grating and squeezing the goodness out of a lemon, lime, grapefruit, or orange is off to a good start in my book.

IMG_2930.JPG

So, I am pretty willing to jump on the citrus fan club, but THIS. CAKE.  Seriously!  If you have been here before, you will know that I am all about butter – especially in baked goods.  I know that butter is not exactly trending these days, but what can I say?    A cake with yogurt instead of butter would normally make me skeptical too, but, in this case, yogurt means lighter texture, a bit healthier, extra moist, and a more pure citrus flavor.  Yes, please to all of the above.

IMG_2931.JPG

Spoiler alert: Stay tuned for a lemon lavender version coming at you on the new and improved almostproperly.com in a couple of weeks…. Who knew a new site wasn’t instant?  This tech-phobic blogger certainly didn’t.  CSS what?  Sooooo grateful for my tech savvy girly who is walking me through even the most basic of basics and knows what the heck things like SQL are and that JAVA isn’t always coffee.

IMG_2928.JPG

Tea parties, brunches, picnics, or even dessert?… Grapefruit and Yogurt Pound Cake is a very good answer.

Grapefruit and Yogurt Pound Cake

Servings: 8
Active time: 15 minutes       Total time: 75 minutes

For the Cake:

  • 1 1/2 cup flour, sifted then measured
  • 2 tsp. baking powder
  • 3/4 tsp. salt
  • 1 1/2 tbl. grapefruit zest
  • 1 1/4 cup sugar
  • 2 tsp. vanilla extract
  • 2 eggs, room temperature
  • 1/3 cup vegetable oil
  • 3/4 cup plain Greek yogurt
  • 5 tbl. grapefruit juice

For topping the cake and glaze:

  • 3 tbl. grapefruit juice
  • 1 tbl. plain Greek yogurt + 1 tbl. water OR 1 tbl. regular plain yogurt (not Greek-style)
  • 1/2 cup powdered sugar, sifted

To assemble the cake: Preheat oven to 350.

In a large bowl, whisk to combine flour, salt, and baking powder.

In the bowl of stand mixer, combine zest and sugar with your fingers until very fragrant and small clumps begin to form (About 1 minute).

Wish together eggs, oil, vanilla, and grapefruit juice in a small bowl.  Using stand mixer, add to sugar mixture by beating on medium speed just until combined.

Then add 1/2 of the yogurt.  Mix just until combineed.  Then add 1/2 of the flour mixture.  Mix just until combined.  Repeat with other half yogurt and flour mixtures, ending with flour and mixing just until combined each time.

Grease and lightly flour a loaf pan (I prefer glass ones since they more evenly distributes the heat.)

Pour cake batter into loaf pan and lightly tap on counter to release any trapped air.  Bake for 50-60 minutes or until knife inserted in the middle comes out clean.

Immediately after removing from the oven, run a knife around the edge of the pan to loosen.  Allow cake to cool in the pan for 10 more minutes.  After 10 minutes, remove cake from pan and continue to cool on wire rack for approximately 15 more minutes.

To assemble the glaze: In a small bowl combine yogurt (and water, if using Greek yogurt) and powdered sugar.  Using a fork, mix until smooth.

Final Touches:  Brush the 3 remaining tablespoons of grapefruit juice on top of cake.  This will add an extra punch of fresh grapefruit flavor while also making the cake extra moist!  Once the cake has fully cooled, drizzle the top of loaf with glaze.

For best glaze results, wait 15 minutes for glaze to set prior to serving:)


Coming soon….

Hi all!  I know it has been a little silent over here for the past couple weeks.  The reason is that a whole new site design is in the works and should be launching SOON.  Very soon.

So, a blog that was originally intended to update friends and family on our adoption process is not exactly in a user friendly format for navigating things like recipes.  And, as you may have noticed, my love of all things food, cooking, baking, and entertaining morphed this little site into something of the food blog variety.  And I am so glad it did!  I love hearing what ya’ll think and some of the creative recipe tweaks you come up with are borderline genius!

So, I want to keep this recipe mojo going, except in a better and easier to navigate format.  Scrolling through pages of recipe posts to find that one you were looking for is not my favorite past time either, and I am betting that ya’ll have better things to do!  Reader experience and navigation is important, so an easily navigable and responsive site is in the works!

Please, bear with me while we are “under construction.”  I am excited to share a new vision for the site when it launches, and – of course – fresh, new recipes!

So, hang tight!  An entirely new almostproperly.com  is coming soon!!


Healthy Vegan Coconut Chia Pudding

Its here!  Its here!  A respite from the rain and gray!  Spring weather has finally ARRIVED in Seattle!  Tulips are blooming and that big ball of fire in the sky is basking us in its warm rays.  Its Seattle, so my standards aren’t high, but we hit 70 the other day!!  70!  Whoop!

The first sign of spring weather makes me a little nutty.  I got all pioneer-y and was tilling up the soil in our little raised garden beds and dreaming about what to plant in them, forgetting that I am a horrible vegetable gardener.

IMG_2834.jpg

Every dinner has been made on the grill.  And we have been prolonging staying outdoors as long as possible with the help of our fire bowl and hot tea.  And, most importantly, we have been breaking out the warmish weather treats.  Although this No-Cook Coconut Chia Pudding might taste like a treat, shhhh, its pretty darn good for you.  Tastes little tapioca balls but with all the antioxidants and protein of Chia.  It is made with coconut milk, coconut water, chia seeds, vanilla extract, shredded unsweetened coconut, and a pinch of salt.  Top it with your choice of fruit and honey, and you have a satisfying little snack or dessert.  Best of all, it only takes 5 minutes of prep!!

IMG_2643.jpg

Healthy Vegan Coconut Chia Pudding

Active time: 5 minutes                          Total time (including chilling): 3 hours
Servings: 8
  • 1/2 cup chia seeds
  • 1/2 cup unsweetened shredded coconut
  • 1 – 14oz. can coconut milk (approximately 1 3/4 cup)
  • 3/4 cup coconut water
  • 2 tsp. vanilla extract
  • 1/8 tsp. kosher salt
  • Fresh berries or other fruit, for serving
  • Honey (optional), for serving

In a large jar or bowl, add chia and shredded coconut.  Pour in coconut milk*, and coconut water.  Stir to combine.  Then Gently stir in vanilla and salt.

IMG_2644.jpgIMG_2647.jpg

Cover or fasten the lid and refrigerate for 3+ hours for the chia seeds to gel and the pudding to thicken.  Can be stored in refrigerator or up to one week.

IMG_2649.jpg

Serve in small bowls topped with fruit and honey if desired:)

(*Note: Use full fat coconut milk.  If coconut milk is separated or has non-liquid sections, lightly warm coconut milk on stove-top while stirring just until combined and liquid throughout.)

IMG_2832.jpg


Gooey Cinnamon Rolls with Cream Cheese Frosting

Did you have a good Easter?  I hope so!  See family?  Eat something delicious?  Our plan was to sneak a mini-escape to the Oregon Coast (beach, books, and relaxation).  I had the car packed, podcasts downloaded, and a thermos full of tea.  Then my husband calls from work.  “We can’t go.”  So, I unpacked the car, and home we stayed.  In the midst his work chaos and long hours, we hunkered down, skipped the family get-togethers, and took in some quiet.  We do not make a habit of hiding out or avoiding the fam.  We aren’t anti-social hermits.  In general, we do quite the opposite.  Honest!

So things looked a little bit different this year.  No big get together.  No weekend away.  It was just us and the four-legged canine kiddos.  No matter.  Regardless of the location, events, or company, there is one requirement in our Easter festivities.  Cinnamon rolls. Well, maybe there are two requirements.  Church!  (It is Easter after all.)

IMG_2642-1.jpg

But, cinnamon rolls…  You know, the kind with thick cream cheese frosting on top?  And the extra gooey cinnamon?  Yup, THOSE.  So whether it’s cinnamon rolls for two or 22, we say bring on the sticky cinnamon deliciousness.  This recipe is truly the best I have tasted due to years and years of the family’s tweaking .  The ingredients and process are very traditional, but what sets it apart is that unlike other recipes I have tried, the results are so, so consistent.  Yeast used to intimidate me, but I think all I needed was a better recipe!

IMG_2616.JPG

This recipe can even be refrigerated after being rolled for up to two days!! When hosting large holidays, having “prepare-ahead” items can be a lifesaver.  The morning you plan to bake, just stick them in a warm dry place to allow to rise until approximately doubled in size.  My oven can go as low as 100 degrees, which is perfect for this.  This step usually takes around 45 minutes.  Then bake for 20, invert the pan so the caramelized juices don’t settle at the bottom, frost, and dig in!!

IMG_2619.JPG

Gooey Cinnamon Rolls with Cream Cheese Frosting

Total Time: 4-5 hours (including rising)        Active time: 1 hour
Servings: 4-8 (depending how many rolls each person eats)

Dough:

  • 1 3/4 cup all purpose flour
  • 1 1/4 tsp. active dry yeast
  • 1/4 cup sugar
  • 1 large egg, room temp
  • 1/2 cup whole milk
  • 2 tbl. unsalted butter (plus more for greasing baking dish)
  • 1/2 tsp. kosher salt
  • vegetable oil for greasing bowl

Filling:

  • 1/2 cup + 2 tbl. light brown sugar
  • 1 tbl. ground cinnamon
  • 1/4 tsp. ground nutmeg
  • 1/8 tsp. kosher salt
  • 1 tsp. corn starch
  • 4 tbl. unsalted butter, melted

Cream Cheese Frosting:

  • 8 oz. cream cheese, room temp
  • 6 tbl. unsalted butter, room temp
  • 2 cups powdered sugar
  • 2 tsp. vanilla extract
  • 1 tsp. lemon juice

For Dough:  In the bowl of a stand mixer fitted with paddle attachment, mix flour, yeast, and sugar until well combined.  Mix egg into dry ingredients until well combined.  In a small saucepan, combine milk, butter, and cinnamon until butter has melted and temperature has reached 120-140 degrees only!  Do not allow mixture to come to a simmer!!  Add milk mixture and kosher salt to flour mixture.  Mix on low speed, and once combined increase speed to medium/high and beat for approximately 3 minutes – or until mixture is very elastic and sticky.

Grease large bowl with vegetable oil.  Shape dough into a ball and place in greased bowl.  Cover bowl with plastic wrap and then a kitchen towel.  Place bowl in a warm, dry place for 2 hours or until dough has doubled in size.  For example, my oven’s temperature can go as low as 100, which is perfect for a dough rise.

Once dough has risen, prepare clean work surface with a liberal dusting of flour.  And prepare the filling.

For the filling: On the stove, melt butter over low heat.  In a small bowl, combine all other ingredients.

Assembly: Grease an 8×8 glass baking dish or glass pie plate with butter.

Punch down the risen dough.  Place dough on well floured surface.  Work dough into ball and dust with flour.  Using well dusted rolling pin, roll dough into rectangular shape that is roughly 8×10′ to 8×12′.

IMG_2610.jpg

Spread melted butter over top of dough leaving a 1/2 inch border at long edge.

IMG_2612.jpg

Generously sprinkle an even layer of the cinnamon-sugar mixture.

IMG_2613.JPG

Starting at long edge, roll dough into a log shape.

IMG_2614.JPG

Slice log into rolls.  The slices should be at least 1″ thick.  You should have approximately 12 slices.

IMG_2617.JPG

Place slices in greased baking dish.

IMG_2620.JPG

Cover baking dish with plastic wrap and a kitchen towel.  At this stage rolls can be refrigerated for up to two days. *See Note below.  If baking rolls immediately, return rolls to a warm dry place until doubled in volume around 45 minutes.

*NOTE: After rolls have been refrigerated you will need to complete the rising step by placing rolls in a warm dry place.  Most likely the rolls will have risen a bit in the fridge so this step will take less than the estimated 45 minutes.  Remember, you want the rolls to double from their original size. 

IMG_2629.jpg

Preheat oven to 375 degrees. Remove plastic wrap and cover with foil.  Bake for 15 minutes.  Remove foil and continue to bake for additional 3-5  minutes or until rolls on the edge have turned slightly golden brown.  Remove from oven and immediately invert rolls onto a serving plate.  This will keep the cinnamon mixture from settling at the bottom.

IMG_2637.JPG

These are delicious and gooey (sticky bun style) on their own, so not everyone will want frosting.  I think they are even more decadent with the frosting of course (frosting assembly instructions below).  We typically leave them unfrosted and place a bowl of frosting on the table so that everyone can add as much or as little as they desire!

IMG_2639.jpg

For the Frosting: In the bowl of a stand mixer fitted with the whisk attachment, combine butter and cream cheese until well combined.  Mix in powdered sugar in two additions.  Add lemon juice and vanilla.  Mix until combined.  Can be made and kept chilled up to three days ahead.  Allow to come to room temperature before serving.

IMG_2638.jpg


Korean Steak Sandwiches

Have you heard the phrase “hurry-up and wait?”  I’m not sure where it originated, but, in our house, there are days when I feel like this mantra is a running theme.  Scratch that, most days, I feel like it is a running theme.

As I write this, my husband was supposed to be home from work and hour ago so that we could leave town for Easter weekend.  I was just about ready to go when I got a text from him saying he is held up at work and would be at least two more hours.  Blah!!  So much for beating traffic. In case you didn’t know, Seattle traffic sucks.  I rush, rush, rushed all morning to sit here and wait – i.e. The Hurry-up and Wait.

With frequent hold-ups and interruptions like these, the timing of dinner can be challenging.  Sure, I have a repertoire of fridge to table in 25 min. or less meals, but on the not-so-rare occasion that I make something more time consuming, I  find myself playing a lovely game of hurry-up and wait.  Maybe, I just need to invest in a crystal ball, but until then…..

I would like you to meet my new favorite thing: these Korean Steak Sandwiches! They are the perfect combination of slowly marinated meat (read: lots of flavor!!) and lickety-split prep time!

IMG_2594.JPG

They take a little bit of planning since the meat marinates overnight, but then its just 10-15 minutes of cook/prep time right when you are ready to eat!  You can even make the spicy, tangy cabbage slaw while the meat is cooking!!

I am not even a fan of red meat, but I am in steak sandwich heaven.  The flavor! The marinade! The slaw!  These are sure to be on our BBQs rotation this summer too!

Korean Steak Sandwiches

Prep Time: 20 minutes + overnight marinating of meat
Servings: 4

Beef and Marinate:

  • 1 cup mirin
  • 2/3 cup reduced sodium soy sauce
  • 2 tsp. sugar
  • 2 garlic cloves, crushed and coarsely chopped
  • 1.5 lb. whole flank steak

Cabbage Slaw:

  • 1.5 tbl. fresh ground chili paste (in the Asian foods aisle)
  • 1 tbl. toasted sesame oil
  • 1 tbl. reduced sodium soy sauce
  • 1/2 tbl. sugar
  • 1 green onion, chopped
  • 2 cups shredded green or napa cabbage

For Serving:

  • Crusty rolls or baguette  (If you live in Seattle area, Grand Central Baking Company’s  Bolo Rolls are awesome here!)
  • Mayonnaise
  • 2 tbl. Cilantro leaves

Do ahead: Combine all ingredients for beef marinate, stir to dissolve sugar.  Add steak, cover and chill at least overnight.

IMG_2572.JPG

When ready to serve: Heat a pan or, better yet, a grill to medium-high heat.  Once heated, add the marinated steak, removing excess marinate.  Depending on thickness, the steak will cook for 7-9 minutes on each side for medium rare.

While meat is cooking, chop cabbage and make sauce for slaw by stirring all ingredients to combine.  Toss cabbage in sauce.

IMG_2569.jpgIMG_2570.jpgIMG_2573.jpg

Once steak is cooked, slice steak against the grain.

IMG_2583.jpg

Slice rolls or baguette in half.  Slather with mayonnaise.  Assemble sawiches, and garnish with a few sprigs of cilantro. IMG_2593.JPGIMG_2595.JPG

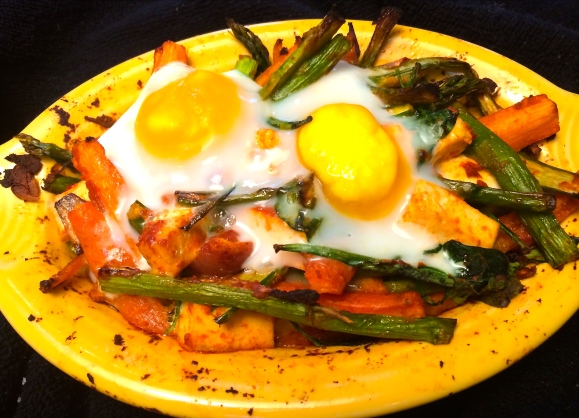
Shakshuka Style Roasted Veggies

Shakshuka, also called Eggs in Purgatory, is a delicious Israeli breakfast dish.  However in the States, this tomato saucy poached egg dish is typically enjoyed for dinner with a big ol’ pile of pita.  My version is a completely un-authentic, Indian curry spiced variation that makes up for its lack of authenticity with aromatic, comfort food bliss.

IMG_2562.JPG

First of all, I almost forgot to ask!  Do you have a mess of various leftover veggies in your fridge?  Great!  Grab ’em all.  While you are at it, grab a couple eggs, tofu, some curry paste, salt, olive oil, and we, my internet friends, have ourselves a meal!

I get almost giddy with the smell of curry paste roasting away in the oven.  You can add tomato sauce or canned tomatoes to the mix to make it saucier and more similar to true Shakshuka if you desire.  The dish below as is would more appropriately be named roasted veggies and tofu with curry paste and topped with an egg, but that seemed a bit wordy.

Use whatever veggies you have handy! The ones listed below are suggestions based on what I have used in the past!

Shakshuka Style Roasted Veggies

Total Time: 35 minutes                       Active Time: 5 minutes
Serves: 4
  • 4 carrots, topped and peeled, quartered lengthwise, then chopped
  • 8-10 asparagus spears halved lengthwise, then chopped
  • 1/2 large onion, cut into 1 inch pieces
  • 2 cloves garlic, coarsely chopped
  • 1 cup spinach, kale, or swiss chard
  • 2 tbl. olive oil
  • 1/2 tsp salt (or more to taste)
  • 1/2 cup extra firm tofu, cubed in 1/2 in pieces
  • 2-3 tsp. red or yellow curry paste, divided
  • 4 eggs
  • (Optional: 14oz. can of pureed tomato)

Preheat oven to 350 degrees.

Place carrots, asparagus, and onion on large baking sheet.  Add olive oil and salt.  Toss to coat thoroughly before placing in the oven.  Roast for 10-15 minutes, until starting to take on color.  Remove from oven.

Transfer roasted veggies to a casserole dish, cast iron pan, ceramic coated dutch oven or other baking dish.  Toss spinach with veggies in baking dish at this time.  Add 1.5-2.5 tsp. curry powder, depending how spicy you want it to be, and stir to coat veggies.*  (*If adding, you will add the tomato puree at this point as well.)

IMG_2550.jpg

Place tofu on baking sheet where veggies had been.  Add 1/2 tsp. curry paste and toss to coat tofu.  Bake tofu for 5 minutes in oven.

IMG_2551.jpg

Remove tofu from oven and gently toss with veggies in baking dish.

IMG_2552.jpg

Increase oven temperature to 400 degrees.

Gently crack eggs on top of vegetable mixture so as not to break the yolks.   You want the  eggs dispersed over the top of mixture.  Bake for 8-10 minutes, or until the egg whites are no longer clear.

IMG_2554.jpg

IMG_2559.JPG

Serve immediately.  While eating, you will want to break your yolks over the top of the veggies for extra sauciness;)

IMG_2563.JPG


No-Bake Granola Bars

If you tell me that something can be made in 5 minutes or less, I will look at you skeptically and ask if it comes with with a sous chef to do the prep work for me too?  I want a recipe that is the real-people, real-time 5 minutes.  Not the if-I-have-a-sous-chef to chop, measure, and prep everything for me 5 minutes.  Read: A recipe that takes a whole lot longer than five minutes for those of us in normal people land.

IMG_2151.JPG

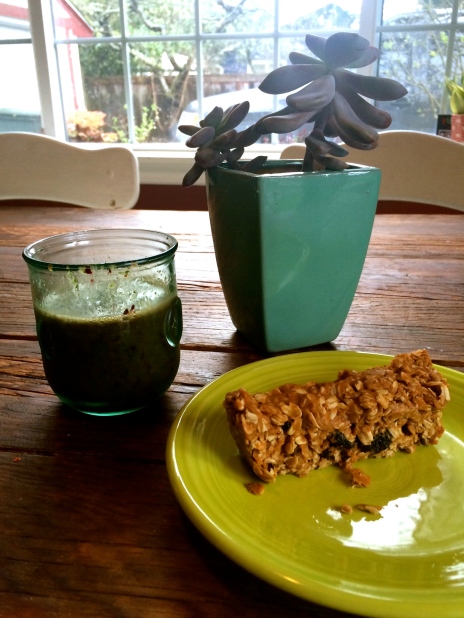
Fast forward to these no-bake granola bars.  Well ya’ll, you can glare at me skeptically if you want, but this is a TRUE 5-minute granola bar recipe that is made without refined sugar, and gives you tons of sustained energy from oats and lots of protein.  I know that you can buy granola bars, but trust me these are cheaper, tastier, and you control EXACTLY what goes into them (read: protein, whole grains, and natural sweeteners) and exactly what does NOT (read: preservatives and refined sugar).  Did I mention that they are completely customizable to your family’s preferences?  My favorite mix-ins are unsweetened dried cherries, but you can add just about anything!  Dried fruit*, nuts, flax seeds, cacao nibs, dried coconut, or a combination would all be quite tasty.  I even added bits of dark chocolate once when I had a sweet tooth. (*If you are trying to avoid added sugar, be careful that the dried fruit you select does not contain added sugar.  Trader Joe’s has some good “no sugar added” options.)

IMG_2150.JPG

Most days, my breakfast routine is not reminiscent of the photo above.  Its a little bit more: put granola bar in plastic baggy, pour tea in travel mug, grab computer bag while running out the door un-mascara-ed.  These are the best grab-n-g0 breakfast I know of.  These bars fill me up and all that protein keeps me full for a good long time!  They are, of course, an excellent snack – its a granola bar after-all.  Also, they are a great healthy way to satisfy a mid-afternoon sweet-tooth;)

For the past few months, there has been a batch of these in my fridge at all times.  Trust me, I am not “that person” who always has homemade granola or fresh baked cookies at the ready, but these only take 5-MINUTES!  And, luckily, 5 minutes for something this satisfying (and handy) is just my speed.

I am addicted and, until there is a 12-step program to cure me of this 5 minute, no-bake granola bar awesomeness, I will not stop.  Despite this development, I think you should join me in the world of never-ending No-Bake Granola Bars.

No-Bake Granola Bars

Total time: 5 minutes

Servings 8-12 (depending on size of bars)

  • 3/4 cup natural peanut butter or almond butter (the kind with oil separation)
  • 2 tbl. coconut oil
  • 2 tbl. molasses
  • 1 tbl. honey (or more if you prefer sweeter)
  • 2 cups oats (I prefer the texture of regular oats, not quick oats.)
  • 1/2 cup total of mix-ins of your choice (i.e. dried fruit, nuts, shredded coconut, cacao, flax)

Combine first 4 ingredients in a small saucepan over medium-low heat.  Stir just until melted enough to combine (about 2 minutes).

IMG_2144.JPG

Remove from heat and stir in oats one 1/2 cup at a time.

IMG_2146.JPG

Finally stir in mix-ins.

IMG_2145.JPG

IMG_2147.JPG

Pour mixture into a glass loaf pan for thicker bars or a glass 8×8 inch pan for thinner bars.  Cover and store in fridge:)


IMG_2152.JPG

Cheese Stuffed Turkey Meatballs

I am almost embarrassed to post this recipe.  It is a departure from everything I gravitate towards.  Its not exactly healthy, its messy, and it has guy-meal written all over it.  But, the gooey cheese filled centers have beaten me senseless.

In a post vacation moment of fridge raiding and “what can I do with ground turkey, eggs and ricotta?,” these meatballs were born.

IMG_2473.JPG

Admittedly, these are not very Mama-Mia Italiano (sorry, Nonna), nor are they the Ikea-clad Swedish variety.  These are more of the lowly, American football watching, dipped in ranch dressing variety.  Its the jalapeño popper of the stuffed pepper world or the hotdog of sausages.  Not fancy in the least. .

Ok, so maybe these aren’t the best thing to serve at a dinner party, but you caught the part about them being stuffed with cheese, right?  How can they not be good?!  My thoughts exactly. 

These aren’t anything fancy, but their assembly can be a bit tricky so I’m posting a few more process photos and explanations than I typically do below.  So for fluffy pre-recipe banter, I am going to keep things simple.

Enjoy!

Cheese Stuffed Turkey Meatballs

Total Time: 40    Active time: 25

Serves: 3-4 people

Cheese Filling:

  • 1/2 cup ricotta cheese
  • 1 egg yolk
  • 2 green onions, chopped
  • 1/2 tsp. salt
  • 1/2 tsp. black pepper, freshly ground
  • 1/2 cup cheddar cheese, grated

Turkey Mixture:

  • 1 lb. ground turkey
  • 1/2 onion finely chopped
  • 3 tbl. olive oil, divided
  • 1/2 tsp. oregano
  • 1/2 tsp. sage
  • 1/2 tsp. cumin
  • 1/2 tsp. coriander
  • 1 egg + 1 egg yolk
  • 1/2 tsp salt (+ more for cooking onions)
  • 1/2 tsp black pepper (+ more for cooking onions)
  • 1/2 cup cornmeal (for rolling)

Pre-heat oven to 350 degrees Fahrenheit.

First heat, 1 tablespoon olive oil in medium frying pan.  Add onion.  Season with sage and salt/pepper.  Cover the pan and stir occasionally.  Cook until soft  until soft.

Set aside corn meal in a small bowl for rolling.

Combine all other ingredients of the turkey mixture including the cooked onions in a large bowl and mix until well combined.

IMG_2461.jpg

For the cheese filling, combine ricotta, green onion, salt and pepper whisk to combine.

IMG_2462.jpg

Whisk in egg to combine.

IMG_2463.jpg

Then stir in cheddar with a fork.

IMG_2465.jpg

Lay out your three bowls: turkey mixture, cheese filling, and cornmeal to make assembly easy. IMG_2467.jpg

Lightly oil a 1/4 cup measuring cup to prevent sticking.  Take a ball of turkey mixture and generously line the measuring cup allowing some to hang out above the edge.  Make sure there is at least a thumb sized depression for the cheese filling to go in.

Place 1 tsp. size blob of cheese fill in in the middle.  Use excess turkey on edge and add more if necessary to enclose the cheese in the turkey.

IMG_2468.JPG

Remove from measuring cup and roll in cornmeal until well coated.  Set aside on a clean, dry, flat surface.

IMG_2469.JPG

IMG_2470.JPG

Repeat this process until all turkey/cheese is used up:)  For me, this makes 8 huge meatballs, but of course you can use a smaller measuring cup (or other similar implement) for smaller meatballs

Heat remaining 2 tablespoons. olive oil in pan over medium-high heat.  Gently add meatballs.  You may need to work in batches.  Cook just until browned on all sides.  Set aside.

IMG_2471.jpg

When all meatballs have been browned, bake uncovered for 10 minutes.  If you see some cheese oozing out of the middle this is a good sign that they are cooked all the way through!

IMG_2472.JPG

Serve immediately with your choice of dipping sauces….I reluctantly inform you that such classy accompaniments as Ranch, bleu cheese, BBQ sauce, and ketchup have all been used to great delight.

IMG_2474.JPG


Curry Spiced Avocado Chickpea Salad Pitas

Pita, pita, pita.  Love it.  But, aside from dip it in hummus and hope that someone makes me a gyro, I never know what to do with it.

After a dinner with the fam, that consisted of moroccan chicken brochettes, lots of sauces, hummus, chopped tomatoes, mint leaves, and, you guessed it, pita.  Now, rest assured, my family can eat.  Leftovers are never really an issue.  Knowing this propensity, I stared at the store shelf for far to long trying to estimate how much pita to purchase.  Thoughts like “if we eat it with hummus before dinner, then probably this much.” And, “But, if we only eat it with the meal, maybe this much?”running through my head.  So I bought for the former and the latter occurred.  The result: lots of leftover pita.

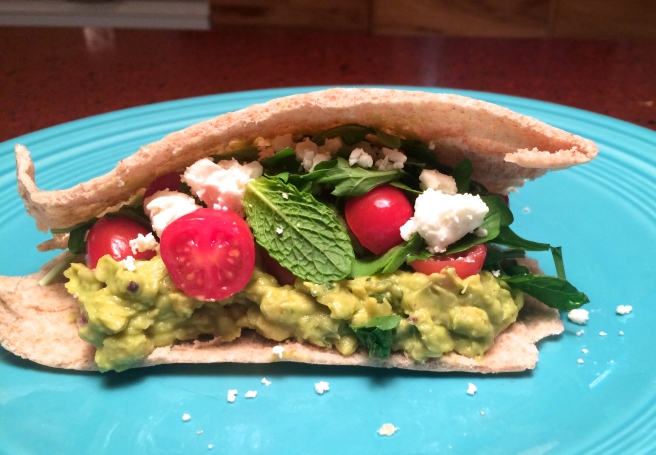
Knowing there had to be a solution other than dipping it in gobs of hummus, this Curry spiced Avocado Chickpea Salad was born.  This egg salad texture but with an entirely mediterranean flavor profile.  This is my favorite type of “______ salad” sandwich filling.  EVER.

IMG_2452.jpg

The filling itself if vegan, vegetarian, and GF friendly.  While that may be music to some of your ears, I can’t say generally speaking that I share the sentiment.  In the interest of full disclosure, when I see a recipe that has the above dietary labels, I automatically disregard it assuming that it will fall into one of two categories: flavorless mush or cardboard-esque.  And, while this recipe has a certain degree of “mush” since this falls into the salad sandwich category, it certainly is NOT flavorless (thanks to curry spices and chopped mint leaves) or textureless (thanks to whole chickpeas and chopped olives).

So, break out the pita and get ready!  You can customize this recipe many different ways, but here is how it is done in our house…

Curry Spiced Avocado Chickpea Salad

5 minutes                                        4 servings

  • 1 large avocado
  • 1 can chickpeas (garbanzo beans), divided
  • 1/4 tsp. tumeric
  • 1/2 tsp. curry powder
  • 2 tbl. finely chopped mint leaves (or a combination of mint with cilantro or parsley)
  • 5 finely chopped kalamata olives
  • Salt and pepper to taste
  • Pita for serving

Additional toppings:

  • chopped tomatoes
  • mint leaves
  • greens like arugula or spinach
  • feta

Remove avocado skin and pit.  Lightly mash avocado in large mixing bowl.  IMG_2443.jpg

Thoroughly rinse chickpeas.  Add around 3/4 of the chickpeas to the avocado. IMG_2444.jpg

Add curry spice, turmeric, and mint (or other chopped herb mixture).  IMG_2445.jpg

Mash until well combined.

IMG_2446.jpg

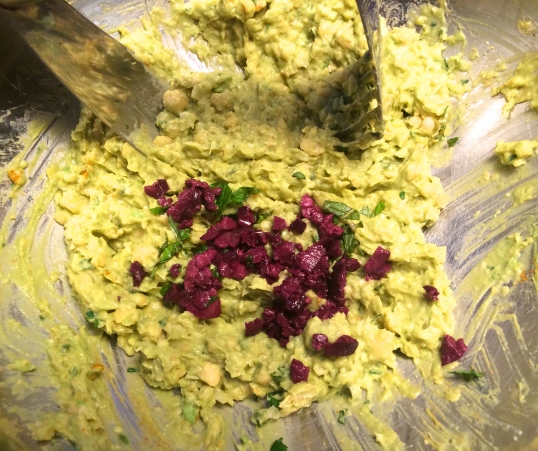
Add finely chopped olives.  IMG_2447.jpg

Add remaining chickpeas. Gently stir to combine (without mashing the additional chickpeas).

IMG_2448.jpg

Place in pita and top with chopped tomatoes, mint leaves, other greens.

IMG_2451.JPG

Add a sprinkle of feta if desired.

IMG_2452.jpg